What is this?
|
What is this?
|
The above drawing is from an article that was published in the November/December 1977 issue of Personal Computing. The article was written by one of their editors but was based on a letter from my father.
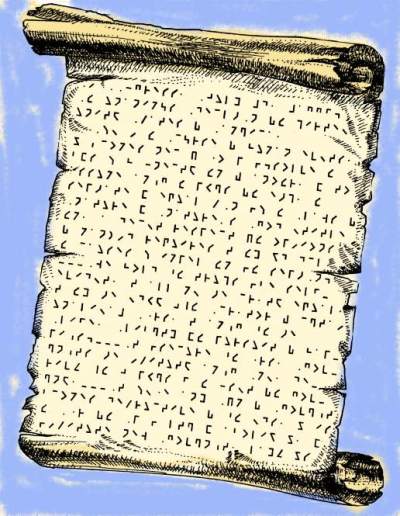
There is a teaser to the article which is a picture of a portion of the Declaration of Independence written on a scroll. It starts with the words "In CONGRESS July 4, 1776" and ends in the middle of a sentence with "and to institute new Government laying its". The picture is actually a literary braille transcription of this text displayed in Kobigraphs.
My father wrote that he had used these symbols, "for a number of years as a set of ink-print, computer-compatible braille analogs for the sighted. I call them Kobigraphs. Braille, as you may know, is based on two columns of three-dot positions each so it is conveniently considered as double octal. The full page enclosure is the preamble to the Declaration of Independence as it appears in Kobigraphs."
The letter continues, "I developed Kobigraphs some years ago as a simple way of writing braille in inkprint--much simpler [by hand] than dots. As the enclosed ... sheet [not shown here] shows, the symbols are formed by joining the dots of a braille sign. I use the minimum number of connecting lines to form a continuous character. No line is drawn through an unoccupied position. All symbols except that for 'k' [dots 1-3] and its complement [dots 4-6] are made with straight lines.... Suggested use for these symbols would be for editing (using a CRT display) brailled material produced either by computer or by hand but destined for multiple copy reproduction as by a Triformations high speed brailler. ... Sighted persons who know braille quickly learn to read and write Kobigraphs."

The diagram to the right shows the braille cells for a-j. Underneath each cell is a modern version of the corresponding Kobigraph which has been drawn in a vector drawing program as a prototype for a Kobigraph font. (Note that some people prefer using a square for the Kobigraph for the cell for "g", dots 1-2-4-5. There is no harm in using a square if you prefer--while my father feels that Kobigraphs are easier to write if you use the minimum number of lines, this certainly isn't necessary.)
Dotless Braille Tip! While the Kobigraphs may look rather abstract when you first see them, most people quickly learn to relate them to the dot patterns of the braille cells. Kobigraphs are very convenient for writing the braille cells by hand. This allows you to use your normal method of writing to reinforce learning the braille cells so it isn't necessary to learn a new writing method, such as slate and stylus, simultaneously with learning the dot patterns.
Kobigraphs are exact analogs to the braille dot patterns. In order to visually "decode" the dot patterns, simply note that there is a dot in each dot position contacted by the figure. That is--except for the six single-dot cells--there is a dot at the open ends of each figure, at each corner, and in the middle of vertical lines drawn through either dot positions 1-2-3 or 4-5-6.
 Chart. Kobigraphs in standard order. |
The chart to the left shows the proposed Kobigraphs for all 63 braille cells; they are arranged in the standard order. As mentioned previously, the cells with dot patterns 1-3 and 4-6 require the use of curves in order to avoid drawing a line through an unfilled dot position while maintaining a connected figure. In other cases, such as dot pattern 1-3-4-6, diagonal lines can be used for this purpose. Again, for some cells there are several options: you should use what you prefer. (Note that, just as for the cells themselves, it is difficult to distinguish certain pairs of cells when a cell is written in isolation. However, braille transcription rules are designed to eliminate this type of confusion for actual text.)
The forms for the Kobigraphs in the Chart were designed for ease of writing by hand (and for use as a braille-like font on older computer displays which used straight lines). However, another possible use for Kobigraphs is for displaying a braille transcription for sighted persons--either on a computer screen or in print.  The advantage to such a display would be that connected figures--as opposed to dots--are much less tiring visually; this would make it easier to spot transcription errors during proofreading.
Volunteer opportunity! It would be straightforward to set up a computer font, in analogy to SimBraille©, based on Kobigraphs . An experienced font designer might determine that a variant--such as the adjacent diagram, which leaves the braille dots as bulges at the ends and corners of the lines in the Kobographs--might be more readable than the plain lines that are easiest for handwritten Kobographs. Smaller bulges or variety in the line widths might also be preferable.
Note. Although the forms for the Kobographs shown in the Chart are the simplest way of connecting the dots, a possible disadvantage is that the most obvious way for writing some of these characters by hand does not make use of the correct 1-2-3-4-5-6 order for the dot positions that is always used when writing with a slate and stylus. (Also, one writes from right to left in that case.)
This may or may not be important depending on whether you are are planning to learn or teach this latter writing method. If you are this situation, it might be preferable to use variant forms--as illustrated in the last diagram--for some of the Kobographs so that they can be more easily written in the correct order. In some cases, all that is needed is to use two strokes and lift the pen or pencil before the second stroke. In other cases, such as those where there are filled dots at the top and bottom but not the middle positions of a column, it is also necessary to make use of curved lines so that the dot positions can be traversed in the correct order.